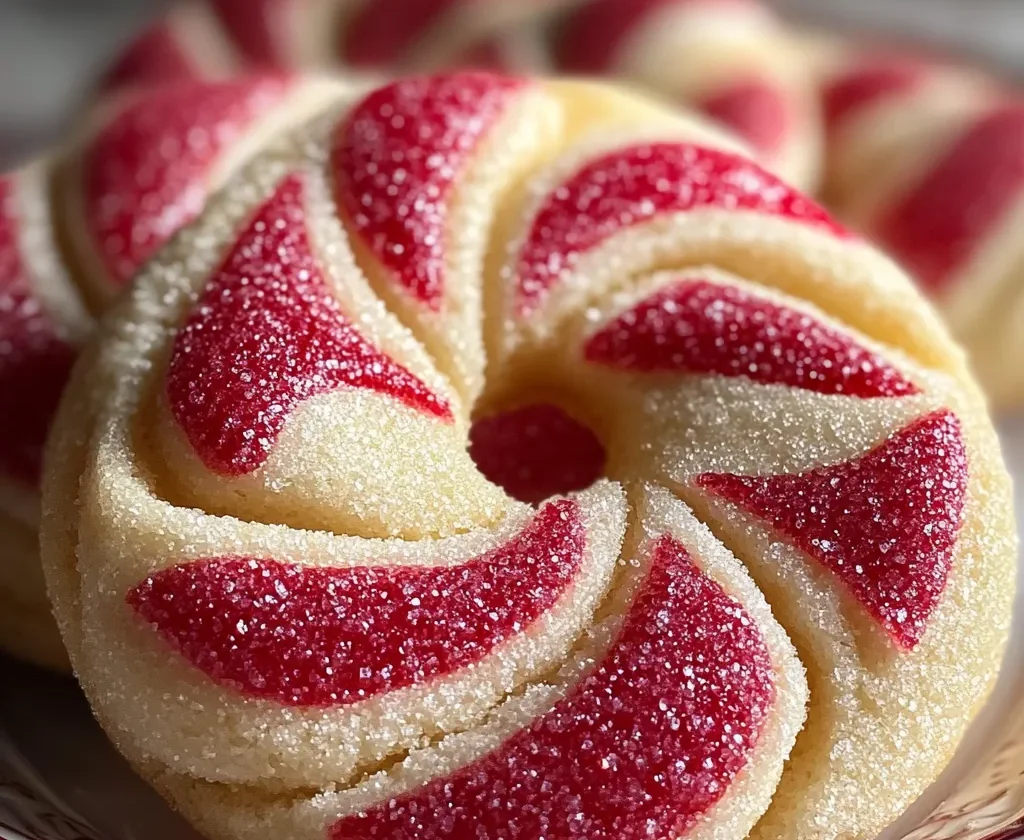
There’s something undeniably magical about holiday baking—the scent of butter and sugar in the air, the hum of seasonal music, and the joy of creating something beautiful and delicious by hand. Candy Cane Cookies have long been a symbol of Christmas cheer, instantly recognizable with their red-and-white swirls and delicate peppermint flavor. These cookies aren’t just treats; they’re edible decorations that bring nostalgia, warmth, and tradition to the holiday season.
For many families, shaping candy cane cookies is just as meaningful as baking them. Twisting the red and white dough together feels festive and playful, making this recipe perfect for baking with loved ones. The subtle peppermint aroma paired with a tender, buttery cookie base creates a balance that’s sweet without being overpowering. Whether displayed on a cookie platter, wrapped as gifts, or enjoyed with a mug of hot cocoa, these cookies capture the spirit of the holidays in every bite.
This recipe keeps things classic, approachable, and foolproof—ideal for both experienced bakers and beginners looking to create something truly special this season.
Recipe Overview
Magic of Candy Cane Cookies are soft, buttery holiday cookies flavored with vanilla and peppermint, shaped into festive candy cane twists using red and white dough. Lightly crisp on the outside and tender on the inside, these cookies are visually stunning and perfect for holiday gifting, cookie exchanges, or seasonal dessert tables.
Ingredients & Instructions
This recipe uses simple pantry staples and a touch of creativity to achieve that iconic candy cane look.
Ingredients
- 1 cup unsalted butter, softened
- 1 cup powdered sugar
- 1 large egg
- 1 teaspoon vanilla extract
- ½ teaspoon peppermint extract
- 2½ cups all-purpose flour
- ½ teaspoon salt
- Red gel food coloring
Step-by-Step Instructions
1. Cream the Butter and Sugar
In a large mixing bowl, beat the softened butter and powdered sugar together until smooth, light, and fluffy. This step is key to achieving a tender cookie texture.
2. Add Wet Ingredients
Mix in the egg, vanilla extract, and peppermint extract until fully combined. The peppermint should be subtle—just enough to give that classic holiday hint without overpowering the cookie.
3. Incorporate Dry Ingredients
In a separate bowl, whisk together the flour and salt. Gradually add the dry mixture to the butter mixture, mixing until a soft, pliable dough forms.
4. Color the Dough
Divide the dough evenly into two portions. Leave one portion plain. Add red gel food coloring to the second portion and mix until the color is evenly distributed and vibrant.
Tip: Gel food coloring works best because it gives bold color without altering the dough’s texture.
5. Chill the Dough
Wrap both dough portions separately and chill until firm enough to handle—about 30–45 minutes. Chilling helps the cookies hold their shape while baking.
6. Shape the Candy Canes
Preheat your oven to 180°C (350°F) and line baking sheets with parchment paper.
Roll small, equal portions of red and white dough into thin ropes. Place them side by side, gently twist together, and curve the top to form a candy cane shape.
7. Bake
Place the cookies on the prepared baking sheets, leaving space between each one. Bake until the cookies are set but not browned, usually 8–10 minutes.
8. Cool and Serve
Allow the cookies to cool on the baking sheets for a few minutes before transferring them to a wire rack. Once cooled, they’re ready to serve or package.
Baking Tips & Variations
These cookies are beautiful as-is, but a few tweaks can make them even more special.
1. Flavor Variations
- Swap peppermint extract for almond extract for a unique twist.
- Add a pinch of crushed candy canes to the dough for extra texture.
2. Decoration Ideas
- Dip one end of each cookie in melted white chocolate and sprinkle with crushed peppermint.
- Dust lightly with powdered sugar for a snowy finish.
3. Make-Ahead Friendly
- The dough can be prepared up to 2 days in advance and stored in the refrigerator.
- Shaped, unbaked cookies can also be frozen and baked directly from frozen with a slight increase in baking time.
4. Consistent Shapes
- Keep dough ropes uniform in thickness to ensure even baking.
- If the dough becomes too soft while shaping, return it to the fridge for a few minutes.
Storage & Serving Suggestions
Storage
- Store baked cookies in an airtight container at room temperature for up to 7 days.
- Freeze baked cookies for up to 2 months; thaw at room temperature before serving.
Serving Suggestions
- Pair with hot cocoa, coffee, or peppermint tea.
- Arrange on holiday dessert platters alongside gingerbread and sugar cookies.
- Wrap in cellophane bags with ribbon for festive edible gifts.
The Magic of Candy Cane Cookies lies in their charm, simplicity, and unmistakable holiday spirit. From their buttery texture to their festive peppermint aroma, these cookies bring joy to both the baking process and the final bite. They’re more than just a dessert—they’re a tradition waiting to be shared, shaped, and savored year after year.
Whether you’re continuing a family tradition or starting a new one, these cookies are a beautiful way to celebrate the season. Classic, cheerful, and irresistibly festive, they’re sure to become a holiday favorite.
FAQs
1. Can I make the dough ahead of time?
Yes, the dough can be refrigerated for up to 2 days or frozen for later use.
2. Why use gel food coloring instead of liquid?
Gel coloring provides stronger color without thinning the dough.
3. Can I freeze these cookies?
Absolutely. Both baked and unbaked cookies freeze well.
4. How strong is the peppermint flavor?
It’s mild and balanced. You can reduce the peppermint extract slightly if preferred.
5. Can kids help make these cookies?
Yes! Twisting the dough is fun and perfect for family baking sessions.
Festive and buttery Candy Cane Cookies with a hint of peppermint. These red-and-white holiday classics are perfect for Christmas baking, gifting, and cookie exchanges.